折腾了好久,最后发现原来的方法不太对,还有v2fly的v2ray-core不好用,新的过程在下面,参考网址:https://xtls.github.io/document/level-2/tproxy_ipv4_and_ipv6.html
项目地址:https://xtls.github.io/
TProxy 透明代理(ipv4 and ipv6)配置教程
本配置参考了TProxy 透明代理的新 V2Ray 白话文教程open in new tag,透明代理(TProxy)配置教程open in new tag以及透明代理通过 gid 规避 Xray 流量open in new tag,加入了透明代理对 ipv6 的支持,并且使用 VLESS-TCP-XTLS-RPRX-Vision 方案对抗封锁 (推荐使用 1.7.2 及之后版本)。
关于 Xray 的配置并不是本文重点,使用者可依实际情况进行修改,具体可以参考官方文档示例open in new tag或其他优秀示例 比如@chika0801open in new tag 又如@lxhao61open in new tag。
注意
若使用其他配置,你需要着重注意客户端配置中 outbound 中tag 为 proxy 的部分,其他部分不变
服务端配置也要同时改变
此配置意在解决例如 Netflix 等默认使用 ipv6 连接的网站无法通过旁路由进行代理的问题,或对 ipv6 代理有需要。
本文网络结构为单臂旁路由
本文中所有配置已在 Arch Linux (Kernel: 6.0.10) 环境下测试成功,如在其它环境中同理
注意安装相应程序 # sudo apt install iptables ip6tables 或 # sudo apt install nftables。
若旁路由未安装 xray 程序,可以手动下载相应 xray 程序如 Xray-linux-64.zipopen in new tag ,然后复制 install-release.shopen in new tag 文件到旁路由,赋予可执行权限 # chmod 700 install-release.sh,然后使用 # ./install-release.sh --local Xray-linux-64.zip 根据提示进行本地安装。
Xray 配置
客户端配置
{
  "log": {
    "loglevel": "warning"
  },
  "inbounds": [
    {
      "tag": "all-in",
      "port": 12345,
      "protocol": "dokodemo-door",
      "settings": {
        "network": "tcp,udp",
        "followRedirect": true
      },
      "sniffing": {
        "enabled": true,
        "destOverride": ["http", "tls", "quic"]
      },
      "streamSettings": {
        "sockopt": {
          "tproxy": "tproxy"
        }
      }
    },
    {
      "port": 10808,
      "protocol": "socks",
      "sniffing": {
        "enabled": true,
        "destOverride": ["http", "tls", "quic"]
      },
      "settings": {
        "auth": "noauth",
        "udp": true
      }
    }
  ],
  "outbounds": [
    {
      //此为默认outbound,路由(routing)模块若未匹配到任何规则,则默认走此 proxy 出口,如果你希望直连国内优先请将下面 direct 出口放到 outbound 第一,看不懂可忽略
      "tag": "proxy",
      "protocol": "vless",
      "settings": {
        "vnext": [
          {
            "address": "yourdomain.domain", //改为你自己的域名,直接填写ipv4或ipv6地址也可以
            "port": 443,
            "users": [
              {
                "id": "uuid", //填写uuid,可通过在终端中输入 xray uuid 生成;此处也支持任意字符串(https://xtls.github.io/config/inbounds/vless.html#clientobject)
                "encryption": "none",
                "flow": "xtls-rprx-vision"
              }
            ]
          }
        ]
      },
      "streamSettings": {
        "sockopt": {
          "mark": 255
        },
        "network": "tcp",
        "security": "tls", //注意使用 xtls-rprx-vision 流控此处需为 tls
        "tlsSettings": {
          //注意使用 xtls-rprx-vision 流控此处需为 tlsSettings
          "allowInsecure": false,
          "serverName": "yourdomain.domain", //改为你自己的域名
          "fingerprint": "chrome" //此设置建议先看下Release, https://github.com/XTLS/Xray-core/releases/tag/v1.7.3
        }
      }
    },
    {
      "tag": "direct",
      "protocol": "freedom",
      "settings": {
        "domainStrategy": "UseIP"
      },
      "streamSettings": {
        "sockopt": {
          "mark": 255
        }
      }
    },
    {
      "tag": "block",
      "protocol": "blackhole",
      "settings": {
        "response": {
          "type": "http"
        }
      }
    },
    {
      "tag": "dns-out",
      "protocol": "dns",
      "streamSettings": {
        "sockopt": {
          "mark": 255
        }
      }
    }
  ],
  "dns": {
    "hosts": {
      "domain:googleapis.cn": "googleapis.com",
      "dns.google": "8.8.8.8",
      "你的VPS域名": "你的VSP IP" //如果 outbound 的 proxy 里 address 填的域名:希望代理走ipv4,这里 VPS IP 填VPS的ipv4, 希望代理走ipv6,这里VPS IP 填VPS的ipv6;outbound 的 proxy 里 address 填的 IP,这行不用写。
    },
    "servers": [
      "https://1.1.1.1/dns-query",
      {
        "address": "119.29.29.29",
        "domains": ["geosite:cn"],
        "expectIPs": ["geoip:cn"]
      },
      "https://dns.google/dns-query",
      "223.5.5.5",
      "localhost"
    ]
  },
  "routing": {
    "domainMatcher": "mph",
    "domainStrategy": "IPIfNonMatch",
    "rules": [
      {
        "type": "field",
        "domain": ["geosite:category-ads-all"],
        "outboundTag": "block"
      },
      {
        "type": "field",
        "inboundTag": ["all-in"],
        "port": 123,
        "network": "udp",
        "outboundTag": "direct"
      },
      {
        "type": "field",
        "inboundTag": ["all-in"],
        "port": 53,
        "network": "udp",
        "outboundTag": "dns-out"
      },
      {
        "type": "field",
        "ip": ["119.29.29.29", "223.5.5.5"],
        "outboundTag": "direct"
      },
      {
        "type": "field",
        "protocol": ["bittorrent"],
        "outboundTag": "direct"
      },
      {
        "type": "field",
        "ip": ["geoip:private", "geoip:cn"], //此处可加入 VPS IP 避免 ssh 时被代理
        "outboundTag": "direct"
      },
      {
        "type": "field",
        "domain": ["geosite:cn"],
        "outboundTag": "direct"
      },
      {
        "type": "field",
        "ip": ["1.1.1.1", "8.8.8.8"],
        "outboundTag": "proxy"
      },
      {
        "type": "field",
        "domain": [
          "geosite:geolocation-!cn",
          "domain:googleapis.cn",
          "dns.google"
        ],
        "outboundTag": "proxy"
      }
    ]
  }
}
服务端配置
{
  "log": {
    "loglevel": "warning"
  },
  "routing": {
    "domainStrategy": "IPIfNonMatch",
    "rules": [
      {
        //阻止 cnip 提高安全性,或者可以将 cn 流量导入 warp 中,详见https://xtls.github.io/document/level-2/warp.html
        "type": "field",
        "ip": ["geoip:cn"],
        "outboundTag": "block"
      }
    ]
  },
  "inbounds": [
    {
      "port": 443,
      "protocol": "vless",
      "settings": {
        "clients": [
          {
            "id": "uuid", //与客户端相同
            "flow": "xtls-rprx-vision"
          }
        ],
        "decryption": "none",
        "fallbacks": [
          {
            "dest": 8080 //回落,需要 web 配合,参见白话文,不设置也行
          }
        ]
      },
      "streamSettings": {
        "network": "tcp",
        "security": "tls",
        "tlsSettings": {
          "certificates": [
            {
              "certificateFile": "/etc/ssl/private/fullchain.crt",
              "keyFile": "/etc/ssl/private/crt.key" //参照小小白话文将生成的 fullchain.crt 以及 cert.key证书的路径相应填于此处(https://xtls.github.io/document/level-0/ch06-certificates.html#_6-4-%E6%AD%A3%E5%BC%8F%E8%AF%81%E4%B9%A6%E7%94%B3%E8%AF%B7)
            }
          ]
        }
      },
      "sniffing": {
        "enabled": true,
        "destOverride": ["http", "tls"]
      }
    }
  ],
  "outbounds": [
    {
      "protocol": "freedom",
      "tag": "direct"
    },
    {
      "protocol": "blackhole",
      "tag": "block"
    }
  ]
}
Netfilter 配置
首先设置策略路由
# 设置策略路由 v4
ip rule add fwmark 1 table 100
ip route add local 0.0.0.0/0 dev lo table 100

# 设置策略路由 v6
ip -6 rule add fwmark 1 table 106
ip -6 route add local ::/0 dev lo table 106

# 直连从主路由发出
ip route add default via 192.168.31.1 #写主路由 ipv4, 采用局域网设备上网设置方法一可不写此命令
ip -6 route add default via fd00:6868:6868::1 #写主路由 ipv6, 采用局域网设备上网设置方法一可不写此命令
使用方法
直接将命令复制到旁路由终端执行
关于直连从主路由发出
在旁路由使用命令ip route show,如果使用下属方法一,则default via后应是主路由 ip,无需更改;如使用下述方法二,则default via后应是旁路由 ip,此时直连网站 DNS 解析会回环,造成直连网站无法访问,因此需指定为主路由 ip。
如果是在路由器上指定了默认网关为旁路由(亦即下述“局域网设备上网设置方法二”),那么就需要设置上述 # 直连从主路由发出 ,除了通过 iproute2 命令行方式设置,也可以通过 dhcpcd 或者 systemctl-network 设置静态 IP,这里以 dhcpcd 为例,编辑 /etc/dhcpcd.conf 文件,在最下方加入如下配置,具体 IP 根据你的实际情况修改,其中 interface 可以通过 # ip link show 查看要设定的网口或者无线设备。
interface enp0s25
static ip_address=192.168.31.100/24
static ip6_address=fd00:6868:6868::8888/64
static routers=192.168.31.1
static domain_name_servers=192.168.31.1 fd00:6868:6868::1
这样通过静态 IP 设置 IP 及网关后就无需每次开机设置 # 直连从主路由发出。
注意
以下 nftables 配置与 iptables 配置二选一,不可同时使用。
使用 iptables
此处配置将 ipv4 与 ipv6 写在同一文件中。
# 代理局域网设备 v4
iptables -t mangle -N XRAY
iptables -t mangle -A XRAY -d 127.0.0.1/32 -j RETURN
iptables -t mangle -A XRAY -d 224.0.0.0/4 -j RETURN
iptables -t mangle -A XRAY -d 255.255.255.255/32 -j RETURN
iptables -t mangle -A XRAY -d 192.168.0.0/16 -p tcp -j RETURN
iptables -t mangle -A XRAY -d 192.168.0.0/16 -p udp ! --dport 53 -j RETURN
iptables -t mangle -A XRAY -j RETURN -m mark --mark 0xff
iptables -t mangle -A XRAY -p udp -j TPROXY --on-ip 127.0.0.1 --on-port 12345 --tproxy-mark 1
iptables -t mangle -A XRAY -p tcp -j TPROXY --on-ip 127.0.0.1 --on-port 12345 --tproxy-mark 1
iptables -t mangle -A PREROUTING -j XRAY

# 代理局域网设备 v6
ip6tables -t mangle -N XRAY6
ip6tables -t mangle -A XRAY6 -d ::1/128 -j RETURN
ip6tables -t mangle -A XRAY6 -d fe80::/10 -j RETURN
ip6tables -t mangle -A XRAY6 -d fd00::/8 -p tcp -j RETURN
ip6tables -t mangle -A XRAY6 -d fd00::/8 -p udp ! --dport 53 -j RETURN
ip6tables -t mangle -A XRAY6 -j RETURN -m mark --mark 0xff
ip6tables -t mangle -A XRAY6 -p udp -j TPROXY --on-ip ::1 --on-port 12345 --tproxy-mark 1
ip6tables -t mangle -A XRAY6 -p tcp -j TPROXY --on-ip ::1 --on-port 12345 --tproxy-mark 1
ip6tables -t mangle -A PREROUTING -j XRAY6

# 代理网关本机 v4
iptables -t mangle -N XRAY_MASK
iptables -t mangle -A XRAY_MASK -d 224.0.0.0/4 -j RETURN
iptables -t mangle -A XRAY_MASK -d 255.255.255.255/32 -j RETURN
iptables -t mangle -A XRAY_MASK -d 192.168.0.0/16 -p tcp -j RETURN
iptables -t mangle -A XRAY_MASK -d 192.168.0.0/16 -p udp ! --dport 53 -j RETURN
iptables -t mangle -A XRAY_MASK -j RETURN -m mark --mark 0xff
iptables -t mangle -A XRAY_MASK -p udp -j MARK --set-mark 1
iptables -t mangle -A XRAY_MASK -p tcp -j MARK --set-mark 1
iptables -t mangle -A OUTPUT -j XRAY_MASK

# 代理网关本机 v6
ip6tables -t mangle -N XRAY6_MASK
ip6tables -t mangle -A XRAY6_MASK -d fe80::/10 -j RETURN
ip6tables -t mangle -A XRAY6_MASK -d fd00::/8 -p tcp -j RETURN
ip6tables -t mangle -A XRAY6_MASK -d fd00::/8 -p udp ! --dport 53 -j RETURN
ip6tables -t mangle -A XRAY6_MASK -j RETURN -m mark --mark 0xff
ip6tables -t mangle -A XRAY6_MASK -p udp -j MARK --set-mark 1
ip6tables -t mangle -A XRAY6_MASK -p tcp -j MARK --set-mark 1
ip6tables -t mangle -A OUTPUT -j XRAY6_MASK

# 新建 DIVERT 规则,避免已有连接的包二次通过 TPROXY,理论上有一定的性能提升 v4
iptables -t mangle -N DIVERT
iptables -t mangle -A DIVERT -j MARK --set-mark 1
iptables -t mangle -A DIVERT -j ACCEPT
iptables -t mangle -I PREROUTING -p tcp -m socket -j DIVERT

# 新建 DIVERT 规则,避免已有连接的包二次通过 TPROXY,理论上有一定的性能提升 v6
ip6tables -t mangle -N DIVERT
ip6tables -t mangle -A DIVERT -j MARK --set-mark 1
ip6tables -t mangle -A DIVERT -j ACCEPT
ip6tables -t mangle -I PREROUTING -p tcp -m socket -j DIVERT
使用方法
将上述配置写入一个文件(如 iptables.rules),之后将该文件赋予可执行权限# chmod 700 ./iptables.rules
最后使用 root 权限执行该文件即可:# ./iptables.rules或# source iptables.rules。
使用 nftables
此处合并 ipv4 与 ipv6
#!/usr/sbin/nft -f

flush ruleset

table inet xray {
        chain prerouting {
                type filter hook prerouting priority filter; policy accept;
                ip daddr { 127.0.0.0/8, 224.0.0.0/4, 255.255.255.255 } return
                meta l4proto tcp ip daddr 192.168.0.0/16 return
                ip daddr 192.168.0.0/16 udp dport != 53 return
                ip6 daddr { ::1, fe80::/10 } return
                meta l4proto tcp ip6 daddr fd00::/8 return
                ip6 daddr fd00::/8 udp dport != 53 return
                meta mark 0x000000ff return
                meta l4proto { tcp, udp } meta mark set 0x00000001 tproxy ip to 127.0.0.1:12345 accept
                meta l4proto { tcp, udp } meta mark set 0x00000001 tproxy ip6 to [::1]:12345 accept
        }

        chain output {
                type route hook output priority filter; policy accept;
                ip daddr { 127.0.0.0/8, 224.0.0.0/4, 255.255.255.255 } return
                meta l4proto tcp ip daddr 192.168.0.0/16 return
                ip daddr 192.168.0.0/16 udp dport != 53 return
                ip6 daddr { ::1, fe80::/10 } return
                meta l4proto tcp ip6 daddr fd00::/8 return
                ip6 daddr fd00::/8 udp dport != 53 return
                meta mark 0x000000ff return
                meta l4proto { tcp, udp } meta mark set 0x00000001 accept
        }

        chain divert {
                type filter hook prerouting priority mangle; policy accept;
                meta l4proto tcp socket transparent 1 meta mark set 0x00000001 accept
        }
}
使用方法
将上述配置写入一个文件(如 nftables.rules),之后将该文件赋予可执行权限# chmod 700 ./nftables.rules
最后使用 root 权限执行该文件即可:# ./nftables.rules或# source nftables.rules
其中,网关地址192.168.0.0/16, fd00::/8等可由ip address | grep -w inet | awk '{print $2}'以及ip address | grep -w inet6 | awk '{print $2}'获得open in new tag
或者在 windows 网络设置中查看。
又或者在路由器“上网设置”中查看。
如果前缀192.168, fd00:相同可不更改,若不同如 fc00:, fe00: 等则更改为相应值,写法可通过 Goolge 搜索得到如 fc00::/7, fe00::/9。
开机自动运行 Netfilter 配置
首先确认已经运行过上述相应 Netfilter 命令,并且成功测试透明代理配置,以确保接下来输出正确的文件。
若使用 iptables 配置
- 首先通过
# iptables-save > /root/iptables.rulesv4# ip6tables-save > /root/iptables.rulesv6将 iptables 配置写入iptables.rulesv4和iptables.rulesv6文件中 - 然后在
/etc/systemd/system/目录下创建一个名为tproxyrules.service的文件,添加以下内容并保存
[Unit]
Description=Tproxy rules

[Service]
Type=oneshot
RemainAfterExit=yes
ExecStartPre=/bin/sh -c 'until ping -c1 192.168.31.1; do sleep 1; done;'
ExecStart=/sbin/ip rule add fwmark 1 table 100 ; \
/sbin/ip -6 rule add fwmark 1 table 106 ; \
/sbin/ip route add local 0.0.0.0/0 dev lo table 100 ; \
/sbin/ip -6 route add local ::/0 dev lo table 106 ; \
/sbin/ip route add default via 192.168.31.1 ; \
/sbin/ip -6 route add default via fd00:6868:6868::1 ; \
/sbin/iptables-restore /root/iptables.rulesv4 ; \
/sbin/ip6tables-restore /root/iptables.rulesv6
ExecStop=/sbin/ip rule del fwmark 1 table 100 ; \
/sbin/ip -6 rule del fwmark 1 table 106 ; \
/sbin/ip route del local 0.0.0.0/0 dev lo table 100 ; \
/sbin/ip -6 route del local ::/0 dev lo table 106 ; \
/sbin/ip route del default via 192.168.31.1 ; \
/sbin/ip -6 route del default via fd00:6868:6868::1 ; \
/sbin/iptables -t mangle -F ; \
/sbin/ip6tables -t mangle -F

[Install]
WantedBy=multi-user.target
- 最后执行
systemctl enable tproxyrules命令。
如果使用 nftables 配置
- 首先通过
# nft list ruleset > /root/nftables.rulesv46将 nftables 配置写入nftables.rulesv46文件中 - 在
/etc/systemd/system/目录下创建一个名为tproxyrules.service的文件,然后添加以下内容并保存
[Unit]
Description=Tproxy rules

[Service]
Type=oneshot
RemainAfterExit=yes
ExecStartPre=/bin/sh -c 'until ping -c1 192.168.31.1; do sleep 1; done;'
ExecStart=/sbin/ip rule add fwmark 1 table 100 ; \
/sbin/ip -6 rule add fwmark 1 table 106 ; \
/sbin/ip route add local 0.0.0.0/0 dev lo table 100 ; \
/sbin/ip -6 route add local ::/0 dev lo table 106 ; \
/sbin/ip route add default via 192.168.31.1 ; \
/sbin/ip -6 route add default via fd00:6868:6868::1 ; \
/sbin/nft -f /root/nftables.rulesv46 ;
ExecStop=/sbin/ip rule del fwmark 1 table 100 ; \
/sbin/ip -6 rule del fwmark 1 table 106 ; \
/sbin/ip route del local 0.0.0.0/0 dev lo table 100 ; \
/sbin/ip -6 route del local ::/0 dev lo table 106 ; \
/sbin/ip route del default via 192.168.31.1 ; \
/sbin/ip -6 route del default via fd00:6868:6868::1 ; \
/sbin/nft flush ruleset

[Install]
WantedBy=multi-user.target
- 最后执行
systemctl enable tproxyrules命令。
tproxyrules.service
注意其中主路由器 IP 地址,根据实际修改
ExecStartPre=/bin/sh -c 'until ping -c1 192.168.31.1; do sleep 1; done;' 命令为确保获得 IP 地址后再执行命令,否则会诡异报错,其中 IP 地址为主路由器地址,根据实际修改。
注意
如果通过 dhcpcd 等设置了静态 IP 及网关,则上述相关 ip route add/del 设置需删除
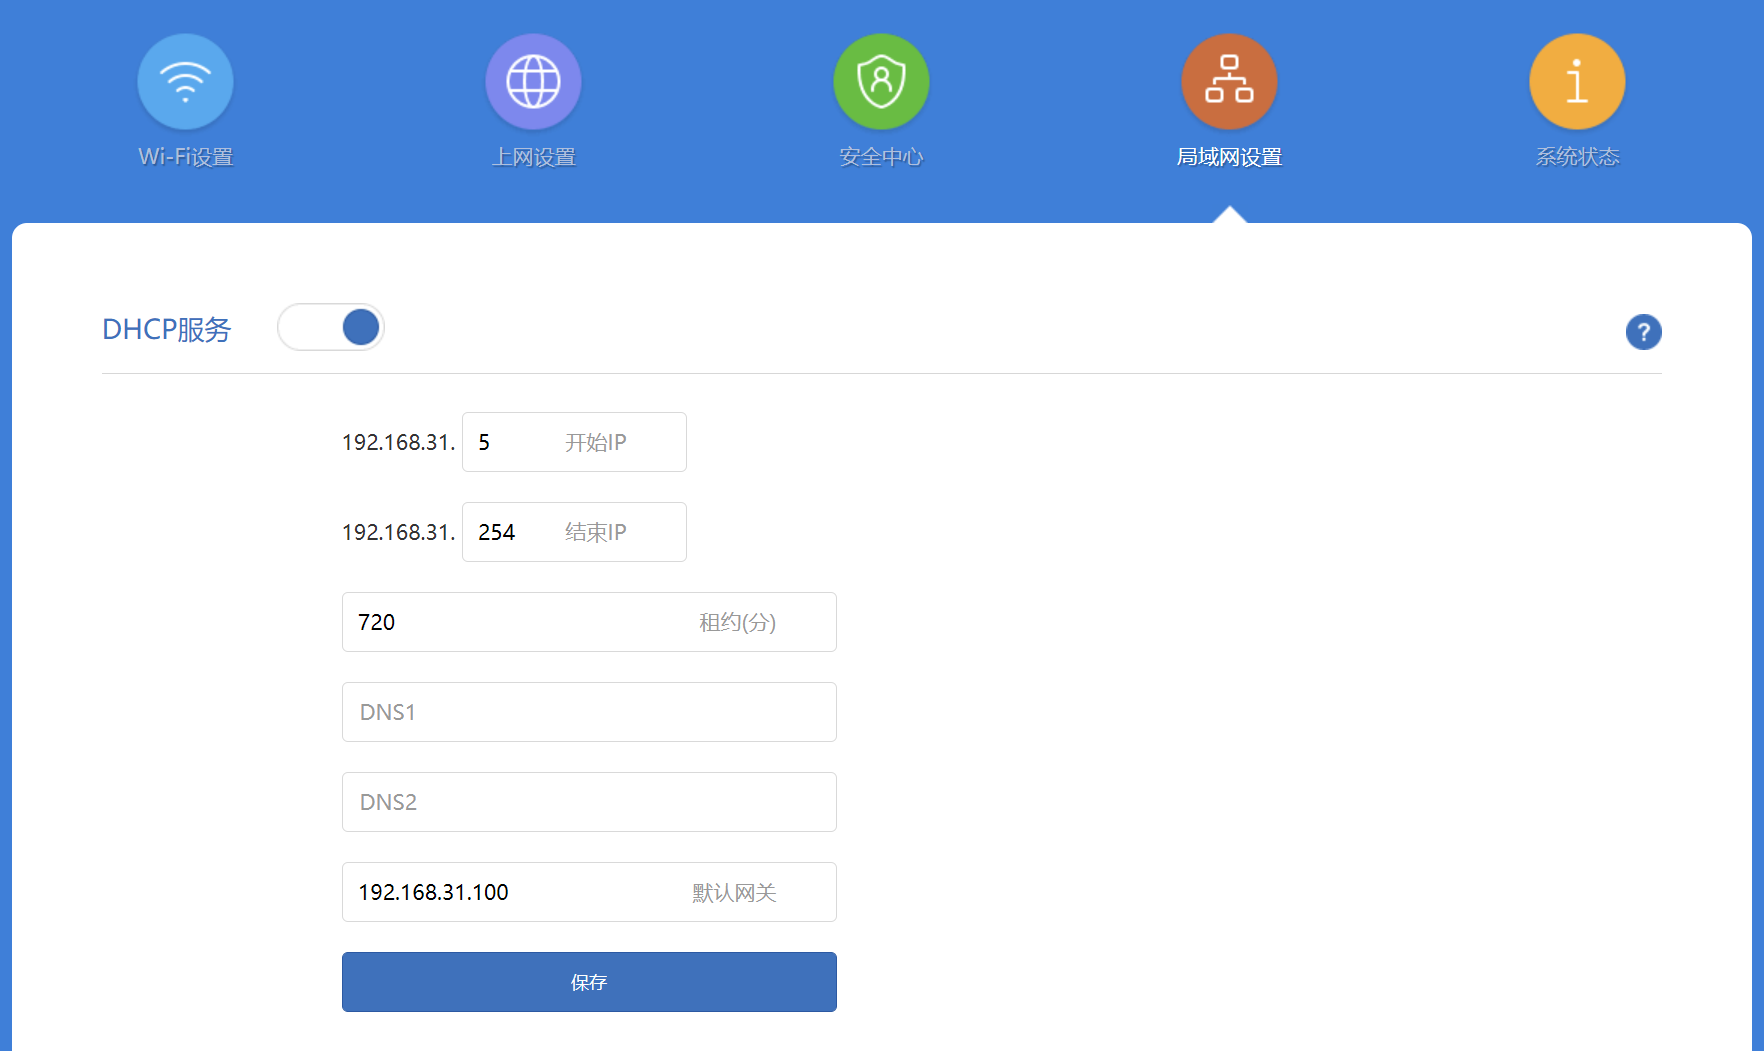
局域网设备上网设置
此处假定旁路由 ipv4, ipv6 地址分别为192.168.31.100, fd00:6868:6868::8866, 旁路由的 ipv4, ipv6 地址可由命令ip add获得。
方法一
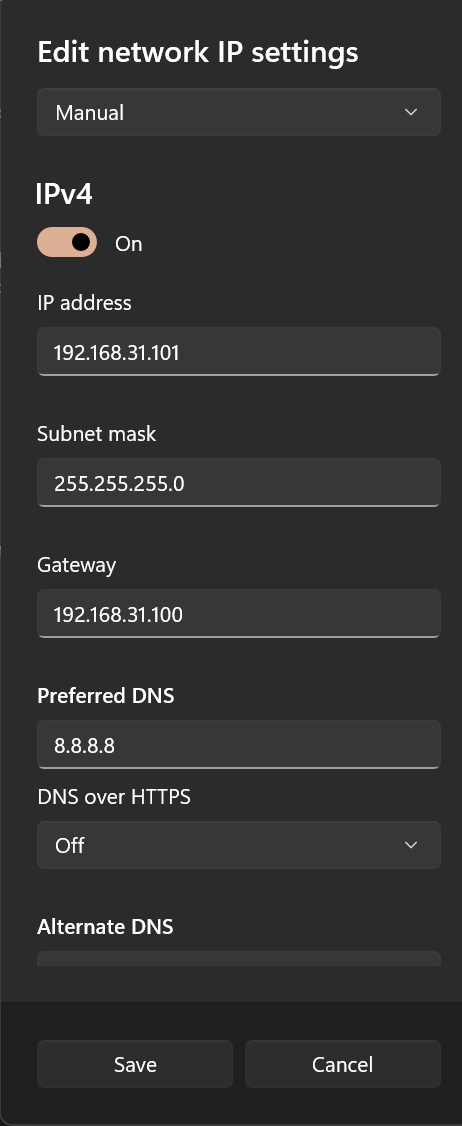
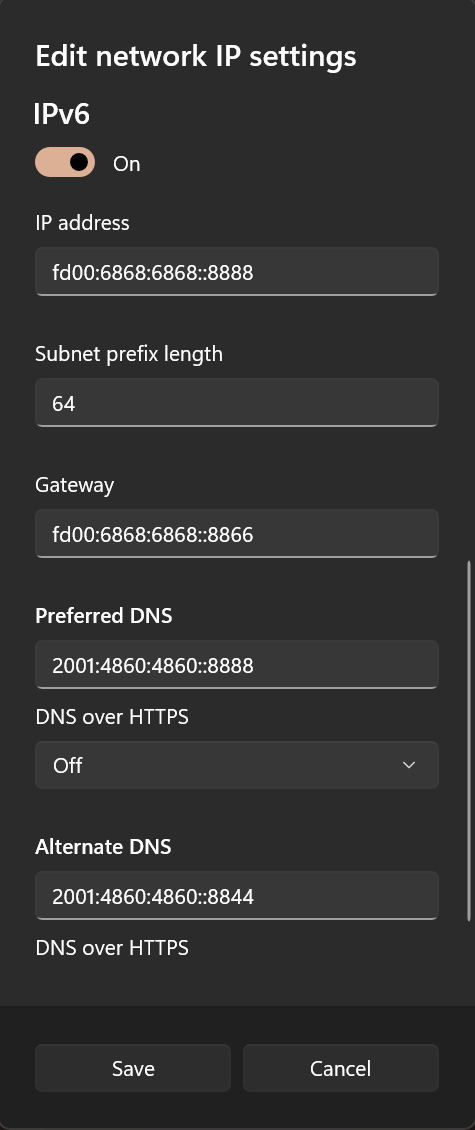
局域网设备上网有两种方式,第一种就是在使用设备上进行静态 IP 的配置,将网关指向旁路由 IP。注意绝大部分手机仅支持手动配置 ipv4 网关,不支持手动配置 ipv6 网关,除非 root 后进行相关设置。
以 windows 设备为例,可以先开启 DHCP 记录自动分配的 IP 以参考,然后手写静态配置。
DNS 设置
此配置劫持 DNS 流量,DNS 可以随便写
建议设置为旁路由 IP,防止 DNS 泄露
方法二
局域网设备上网的第二种方式,是在路由器上进行网关设置,这种方法对于连接到此路由器的设备无需做任何设置即可科学上网,但注意有些路由器不支持 ipv6 的网关设置,有 ipv6 需求的设备仍需在所需设备上单独手动配置 ipv6 相关设置参考方法一。
Finally
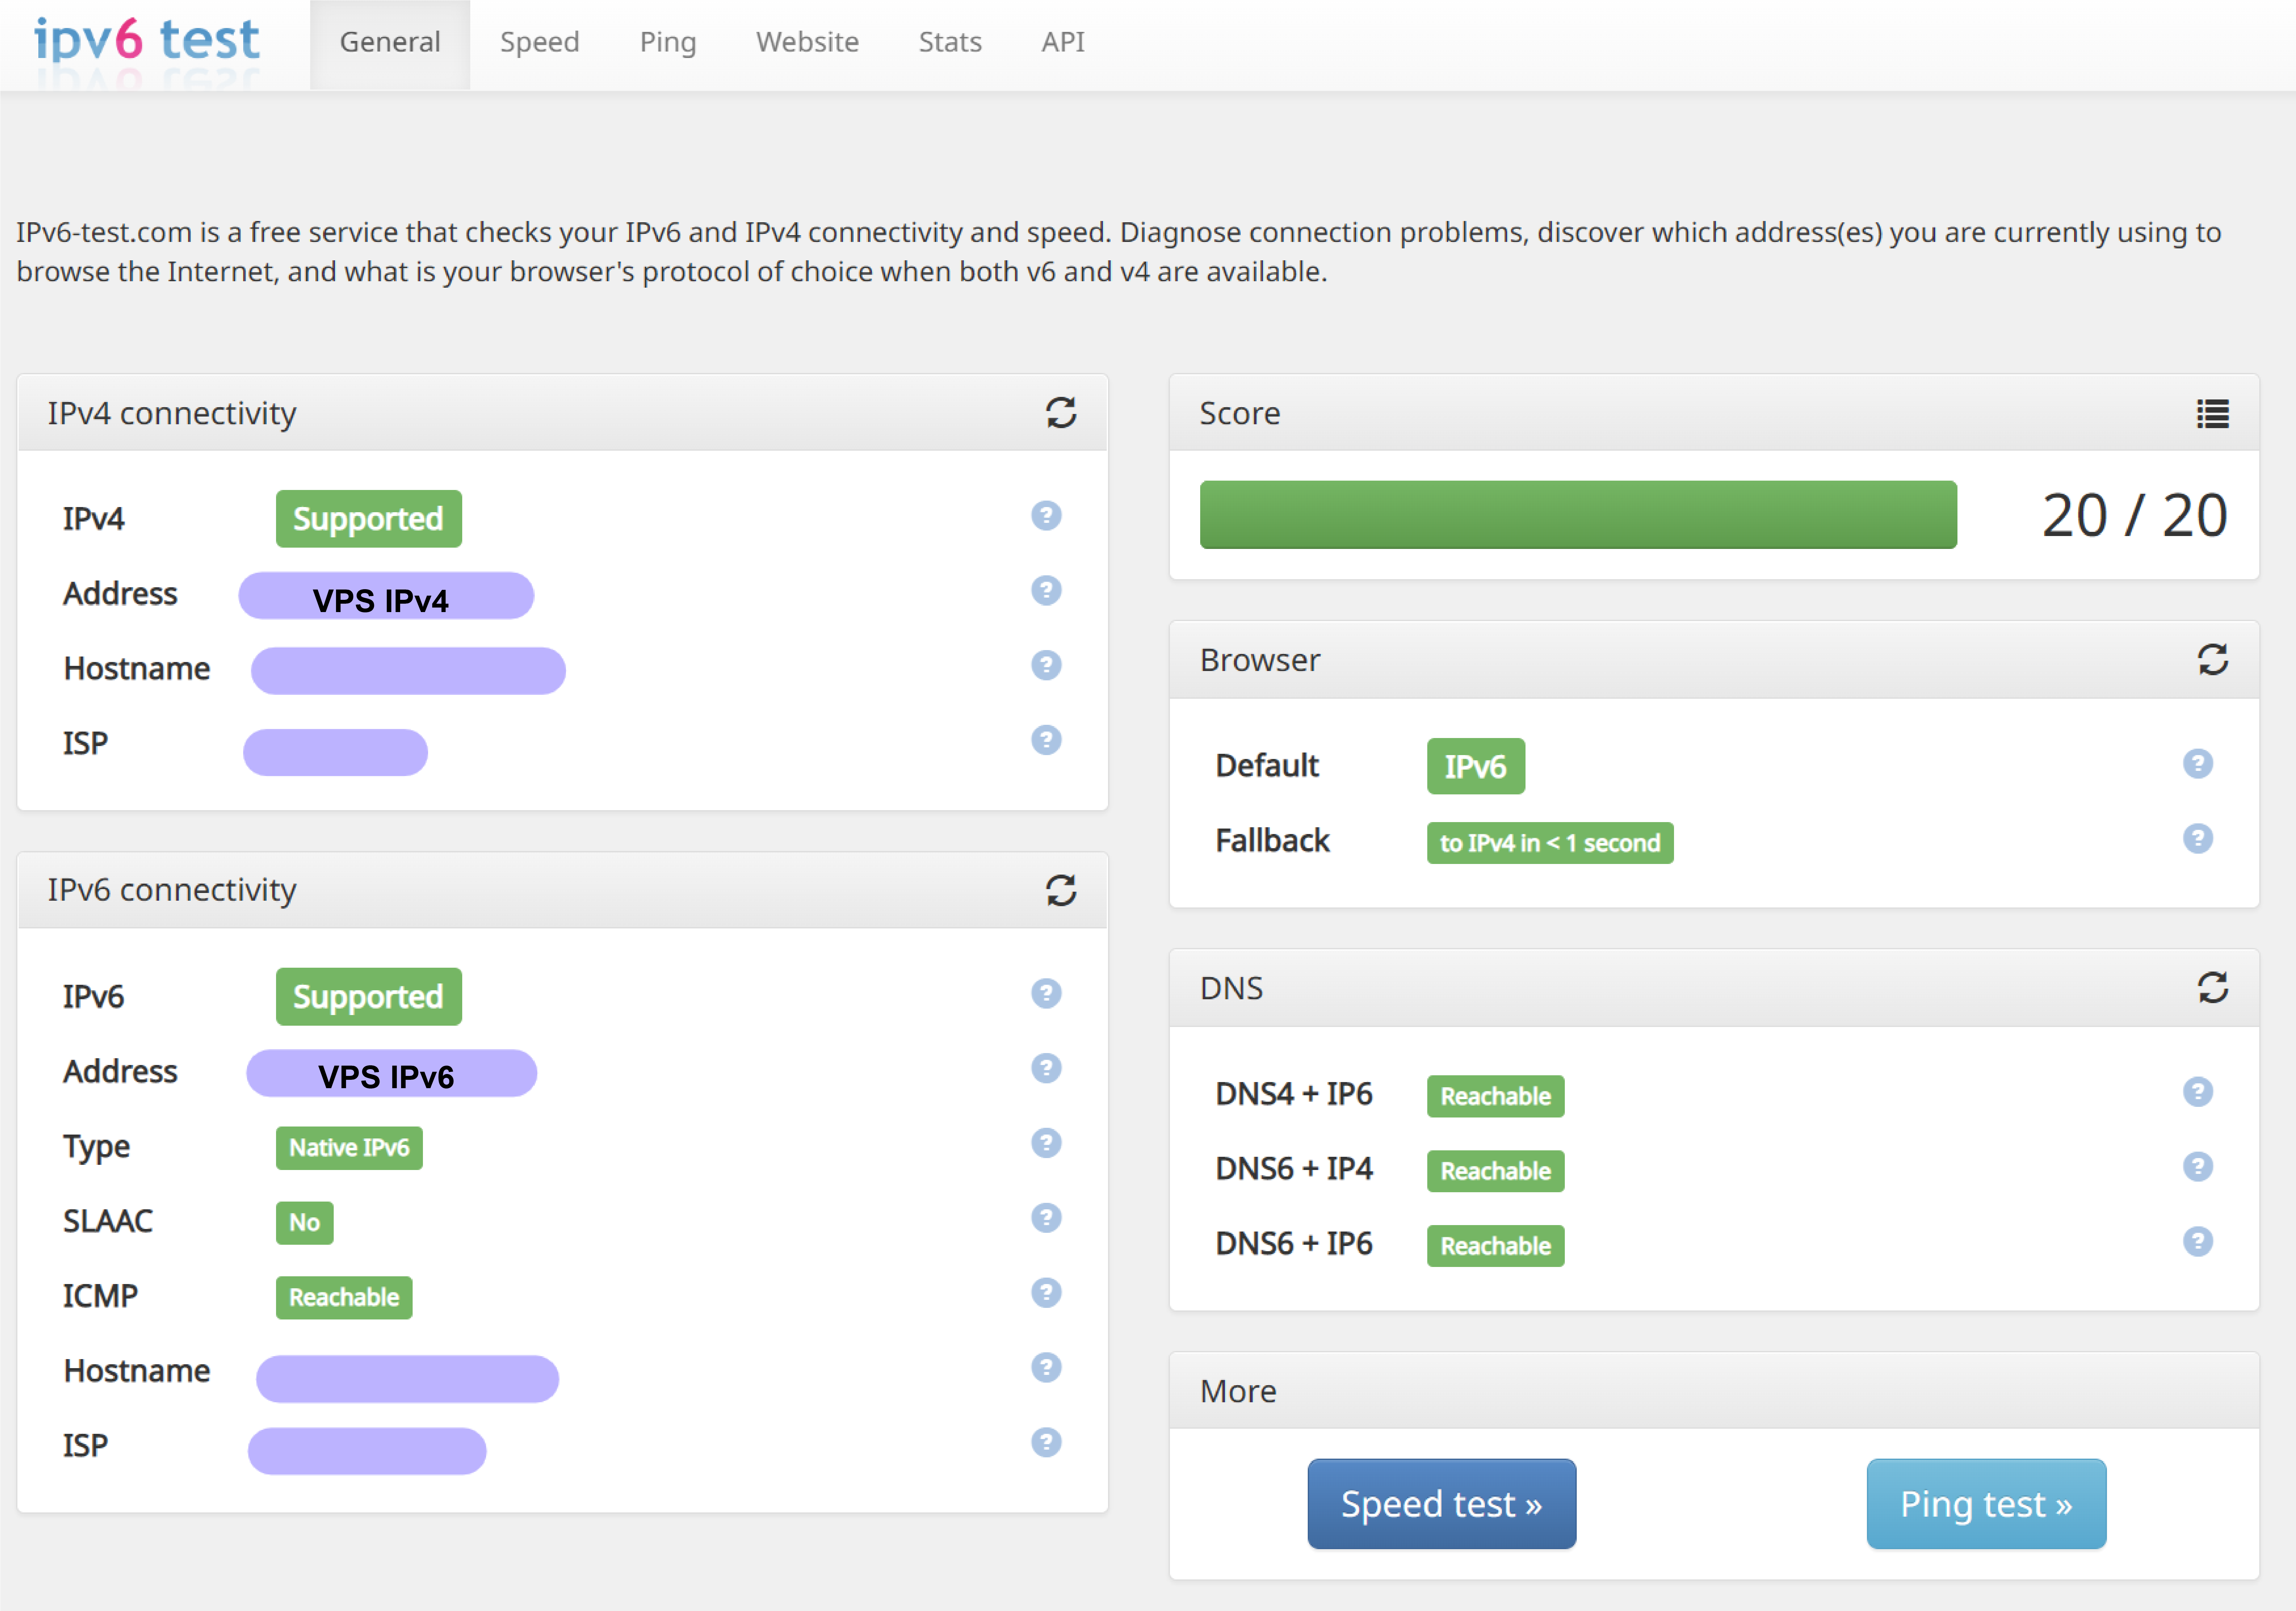
按照以上方法设置后设备即可双栈访问,进入测试网站比如 https://ipv6-test.com/ 可以看到如下结果 (需要代理此网站才能看到如下结果)
写在最后
如今 ipv6 并未完全普及,我们日常访问的流量 99%仍为 ipv4 流量;很多 VPS 商家虽然提供 ipv6 地址,但线路优化非常垃圾,甚至处于不可用状态,为何要加入 ipV6 的设置?
可以看到目前 ipv6 处于很尴尬的境地,各种设备对于 ipv6 的支持很烂,但是都在逐步完善,同时 Windows 系统对于 ipv6 的优先级也在提高,很多浏览器也会优先进行 ipv6 的解析以及访问,很多网站也开始默认使用 ipv6 进行访问(比如 Netflix, 如果没有配置 ipv6, 浏览器打开 Netflix 会显示 Not Available 是因为没有代理 Netflix 的 ipv6 请求,当然可以选择禁用 Windows 的 ipv6,但支持 ipv6 的 pt 站就无法使用)
这种情况下 ipv4 无法完全胜任网络冲浪的需求,即使是那 1%的流量,遇到了也会让人头疼不已。
而可以预见 ipv6 也会逐步与 ipv4 分庭抗礼,所以有必要加入 ipv6 的设置。